Making Webcomics: Tools & Equipment
While it might seem like you need state of the art equipment in order to make a webcomic, its actually pretty far from the truth. Webcomic creation can be highly simple or complex depending on your level of comfort with technology and budget. Here’s a rundown on some of the most common tools to create webcomics.
One of the key issues with webcomics as opposed to traditional comics is obviously the translation to a digital medium and being able to post them on the web. This need means that you will need to decide if you want to create your comics with traditional mediums like pen and paper and then digitize the work OR if you want to work entirely in the digital realm.
At this point you need to make a decision if you want to use a scanner or invest in a digital tablet.
Scanners
Flatbed Scanners are reasonably cheap these days, ranging from as low as 60$ to much higher for better quality. A lot of people have access to scanners for free either through a combination scanner/printer at their parent’s home office or school/work, or even for use at the library.
This can make getting your comics online very economical, and for those of us who are very comfortable with the ol’ pen and paper, a quick, easy, and economical way of making webcomics. With a minimal investment, as well as a less steep learning curve, many people find scanning traditionally made artwork a good way to go.
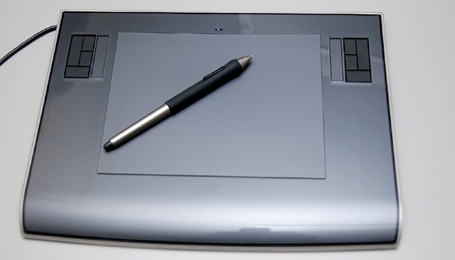
The other option, which has a little more expense and a lot more of a learning curve (particularly to those of us who have been trained traditionally), is the digital tablet.
Tablets
Digital tablets are all the rage these days among artists, and while indeed pretty amazing things, they aren’t the holy grail of webcomics. The advantage of the digital tablet is that it allows you to create 100% digitally, avoiding the transition of pen and ink into digital space. You simply draw in the digital space to start with. This is advantageous in that it saves the translation and clean up time, but it has a significant learning curve for those of us who are used to the feeling of pen and paper.
The first thing one will notice is that the disconnect between looking at the screen and drawing in your lap is a bit disorienting at first and takes a bit of time to master. The second is that, if the tablet isn’t particularly sensitive, one may have to press very hard on the plasticy surface of the tablet to retain control of the pen. This can lead to some wrist trauma in the beginning until you realize that you can’t ‘draw’ on the tablet like one might with a pencil, but rather it is more akin to traditional painting. Soft, light strokes, which again can be frustrating if the tablet isn’t sensitive enough. This seems to be less of an issue for artists learning to draw than those of us who already KNOW how to draw or have been formally trained in traditional mediums such as pencil, graphite, ink, markers, or paint.
Personally it took me about a year of determined effort to make the transition between traditional art and using a digital tablet. While it may take another person more or less time than myself, I found it to be an issue in patience, and also, an issue in product education.
Selecting and Buying a Tablet
Most people tend to prefer a Wacom brand tablet, although there are other, more affordable options, but the touch sensitivity, driver quality, and responsiveness vary. I personally only have extensive experience with the Wacom tablets, so I will focus on them for the moment.
Wacom Bamboo
Wacom tablets come in basically three flavors. The first is the entry level Bamboo, which is a distinct improvement in some ways over the older Graphire line. It is a little more responsive, durable, although it has a very ‘toy’ plasticy feel. The detachable cords make it more suitable for moving around and its light. The price is also good for an entry level tablet, at just under 100$. The bamboo also supports touch as well as pen, which gives you some more organic options for scrolling and so forth. The only issues is that the physical size of the tablet is very small, and it does not have the pressure or tilt sensitivity of the more professional Intuos line.
Intuos 4
For those who are professionals or demand a higher quality tablet with greater pressure sensitivity, a more velvety feel (the surface resembles a really soft velum) with a superior pen with exchangeable nibs, the Intuos would likely suit you a lot better than the Bamboo. Currently in its 4th incarnation its quite shiny. It has several backlit, digitally displayed short cut buttons and can be oriented for righties or lefties. It also has a nice little scroll wheel which can be used for on the fly zooming or scrolling while drawing. The tablet comes in many sizes, from the small tablet (12.2″ x 8.2″ x 0.5″ with an active drawing area of 6.2″ x 3.9″) to the XL size (24.5″ x 18.2″ x 1.1″ with an active drawing area of 18.2″ x 12.0″), one can decide which size best suits their drawing style and work space. There is also a wireless version for those who dislike wires or move around a lot. The price of these tablets vary, but the small version starts at about $230, and the largest size is about $780. Although the Intuos, while much superior in terms of touch, feel and sensitivity to the Bamboo, still suffers from the ‘can’t look where you are drawing’ problem. The Cintiq is the ultimate solution, and also, with no coincidence, has the biggest price tag.
The Wacom Cintiq
The Cintiq is one of the sweetest things you’ll probably ever have sitting on your desktop if you can cough up the $1000-$2000 to own one. These badboys are not only huge, but are essentially a flatscreen monitor you can draw on, eliminating the problem of having to look away from where you are drawing. A stable of most big pro illustrators and 3d artists, these tablets are quite amazing. These tablets boast the same great tilt and pressure sensitivity as the Intuos, also are designed to be used ambidextrously and have touch strips for hot keys on the side and back. There are only two versions of them, and both are quite large.
As with all tablets, I’d highly advise anyone looking at purchasing one to actively demo one at a store, or try a friend’s before committing to buying one. Some people really dislike them, other people can’t live without them once they’ve tried them. Its a highly individual preference.
Programs for Making webcomics
There is actually a variety of programs that can be used to make comics. A lot of artists think they have to have Adobe Photoshop, but this isn’t really true. While photoshop has a lot of nice features, it actually isn’t as well suited as some other programs for certain comic making tasks. Photoshop also has a pretty hefty pricetag and learning curve, so its not always the best choice for someone just starting out. Here I have listed some programs from free to cheap to down right expensive.
Free Programs
There are quite a few free (or almost free) programs that people have adapted to learn to use for webcomics.
Pixia – A free drawing program, it handles tablet input well and feels a lot like open canvas crossed with an early version of Corel Painter, but more refined. Originally developed for japanese consumption its got a lot of tools that create a soft, watercolorish feel. Getting hard coloring out of this program is a little more difficult than others. You can import images you’ve scanned and color them using layers, and it actually works rather well. You can also draw digitially right into the program. It is more designed for illustration work however, and does not have any real comic layout type tools to speak of.
The Gimp – This is a free, geeky alternative to photoshop. It offers most of photoshop’s functionality, although the interface is different and slightly more… engineering like. For the most part however, almost all of photoshop’s basic features are included. If you can get past the learning curve, this is a good alternative tool for importing and coloring. I’ve never tried it for digital inking, or pure drawing, but I’m willing to bet its similar to Photoshop, not the best, but not the worst either.
Opencanvas 1.1 – Originally developed by Portalgraphics, this program was designed to work with tablets. As such it produces very nice lines, and is simple and paintlike to use. It also has the unique feature of being able to connect with friends and ‘sharing’ a canvas to ‘art jam’. Its is actually possible with this program to have one person drawing, and one person coloring at the same time. But it is a very early version of the latest Opencanvas, so the tools are very simple and not too refined. Its free though, you can still find it for download on the web.
Inkscape – If vector drawing is more your speed, and Adobe Illustrator interests you more than photoshop, Inkscape might be your answer if you are looking for a free open source alternative. Inkscape is a free open source vector drawing program that works reasonably well. Vector programs also work well for layout, creating panels and such, so you may want to investigate it even if you intend to do your primary illustrations in another program.
Cheap Programs
These programs are NOT free, but they aren’t expensive either in comparison to some of the top end options. A consideration if one wants something a bit more specialized, a bit more refined, but doesn’t have a lot of cash.
ArtRage
Price: Varies. 22$USD for the cheapy edition up to 87$ USD for the Studio Pro edition
Publisher: Ambient Design
ArtRage is more of a ‘painting’ program than one specifically for comic making. Originally this program was more designed as a sort of cheap alternative to Corel’s Painter. It mimics traditional mediums like oil paint, complete with texture of paper and paint. It can do some pretty neat stuff with medium, texture, and there is a demo that can be downloaded. Its very fun and easy to sketch in with a tablet, and the painting aspect of it is quite amusing. However, because it is more of a ‘painting’ program, it assumes you will start via tablet (although it can open jpgs and such to import scanned work), and it has no layout functionality to speak of. Illustrations look pretty though.
MangaStudio Debut
Price: $49.99 USD
Publisher: Smith Micro
This is a good product for digital comic makers, particularly on the drawing side. It has a lot of great features for keeping your lines strait, handling pencil/blue pencil/inking/perspective, importing images and painting over them on layers, even has filters for generating things such as speedlines and half tones. This program also includes a reasonably powerful layout component for creating dynamic layouts for your comics, text bubbles, and inputting text. The only part I felt it fell down on was coloring duties. Originally designed for manga, it was more focused on black and white, halftones, and greys, and works fantastically if that’s what you are trying to go for. However, I’ve still found other programs have superior handling of color. But for the digital inking and drawing tools, it’s been invaluble. Manga studio also allows you to import 3D objects to draw over, and include in your renders. There is a EX version of this software as well.
OpenCanvas 4.5+
Price: About $82.59
Publisher: PortalGraphics
This program feels a lot like Pixia, but more refined in some ways. The tools are a bit more intuitive, it has a lot of similar features to photoshop, but was definitely designed with an artist in mind. It has aspects of painter/artrage in terms of the way it mimics watercolors, felts, and even acrylics to some degree, but has inking/layer/text/transformation/and importing abilities. This program also has the unique ability to record your steps as you work and play them back. Unlike its earlier incarnation, this program cannot connect to peers, which is kind of a shame. This is the ‘mature’ version of the free opencanvas. If you liked Pixia or the original Opencanvas, you may find you also like this one as well. Like a lot of other illustration programs it doesn’t have layout tools per se, but it does have the ability to make strait lines and work on different layers with different layer effects, so adding textbubbles and layout lines is reasonably easy and clean.
Corel Paintshop Pro
Price: $99.99
Publisher: Corel
Corel’s competing product to Adobe’s Photoshop, it offers a cheap, well developed and mature product that does a lot of stuff Adobe does. Many comic artists have turned to this as a more inexpensive method of coloring or drawing as many of the techniques and tools used in Photoshop can also be used by this program. I’ve never personally used it, but I know several comic artists who have.
Deleter Comicworks
Price: $110.00 USD
Publisher: Deleter
While I’ve not personally used this software, it is basically a competitor to MangaStudio. I understand it has some superior functionality to Mangastudio in terms of handling input and layout, as well as tone generation and speedlines. I haven’t confirmed this however. It is touted as a professional Manga tool, although I know for a fact such tools can be used to produce any sort of comic. Unfortunately for this product it is lacking english support and their english website is kind of broken.
Expensive Software
This gets into the heavy hitter type software, at this level, we are talking professional. Most of this software is either the pro version of one of the cheap versions or the professional end of digital artistry tools. Keep in mind the prices listed are the base price listed by the manufacturer/publisher. Sometimes you can get a copy for less on a sale, or if you are a student, look into educational pricing.
MangaStudio EX
Current Version: 3
Publisher: Smith Micro
Price: 299.99 USD
The EX version is the pro version of Manga Studio Debut, as such you can upgrade from Debut to EX any time you like and take 50$ off the pricetag. EX has some vector capabilities that Debut lacks, as well as a tremendous library of resources (3D models, half tones, Backgrounds, brushes etc) that you can use with the program. It also has a few other layout, layer, and useful tools debut lacks. For a complete comparison between the debut and ex versions, click here.
Corel Painter
Current Version: 11
Publisher: Corel
Price: 399.99 USD
The original standard in digital painting software, Corel Painter is a beautiful program for doing coloring and digital artworks. It has capabilities of mimicking traditional mediums in such a way to make it almost impossible to tell that the artwork was done digitally. This adds interest and depth to illustration work. It also behaves a bit more like the real deal, and as such is nearly useless without a decent digital tablet. It can import works to use as under-paintings, but you really REALLY need a tablet to take full advantage of this program. Because this program is geared towards illustration and not layout, many comic artists who use it end up doing their artwork in this program and then exporting it to another program to layout into comic format.
Adobe Photoshop
Current Version: CS5
Publisher: Adobe
Price: $699 USD for the standard version, $999 USD for the Extended
This is often lauded as the holy grail of comic-dom, but honestly, it isn’t. While photoshop works very very well for some applications, it actually isn’t the best or most comfortable program to draw in. It works very well as an intermediate program, importing and fixing up line art that has been scanned or digitally painted elsewhere, and is quite powerful when it comes to color handling. Vector capabilities in photoshop make it easy to digitally ink via vectors, or create very professional looking digital coloring. The program is complex however, and takes quite a lot time and dedication to master. Originally the program is designed for photo manipulation, and as an art tool secondary, and many of the ways photoshop does things reflects this. It is however an industry standard, and a lot of artists feel that learning this program is important to improving their work.But if you do choose to go this way, I highly suggest investing in not just the software, but some kind of class or tutorials as well. Its very easy to get lost in the program and many find it very counter intuitive at first, particularly if they’ve never used Adobe tools before. The sheer volume of ‘stuff’ is just overwhelming. I suggest if you are just getting into the comics world to try some of the other free or cheap programs before running to photoshop, get your feet wet, and then decide if you want to invest the time and money into learning this powerful program.
Adobe Illustrator
Current Version: CS5
Publisher: Adobe
Price: $599 USD
This is Adobe’s vector drawing solution, and if you like the painting/drawing of most of the other programs, this particular program might come as a bit of a shock in terms of how it works. Because this program deals with vector drawing, everything is done by ‘points’, which draw lines between each other. One must have a pretty good sense of vectors if they just want to pick this program up and learn it, otherwise it can have a steeper learning curve than even Photoshop. Once you figure it out however, there are a lot of advantages to vector drawings, and the LiveTrace functionality is a godsend to inking scanned images quickly and efficiently. If you are thinking of going this route, try Inkscape first, and if you like it, you’ll probably get along with Illustrator.
Adobe Flash
Current Version: CS5
Publisher: Adobe
Price: $699 USD
I’m not sure why, but a lot of comic artists like flash as a drawing tool. Again, completely unsure why, I found it highly clunky compared to other methods, but because of the prevalence, I thought I’d mention it. Like Illustrator it works in vectors, but has a sort of more intuitive set of drawing tools that behave more like photoshop’s tools. Although this program is more meant for animation than illustration, some people have gotten interesting results combining the two aspects of this program.
Traditional Tools
If you’ve gotten through all of this and still are all ‘but I just wanna draw with what I have…’, don’t worry. You’ll still need a scanner to get things online, but there isn’t a limit on what tools you can use to actually make your comic. You may want to keep a few things in mind however.
1 – Most flatbed scanners are only 8.5 x 11. That’s a standard letter size sheet of paper. You might want to consider working at that size or maybe 9×12 if you like to put a border around things, simply because of the difficulty involved in scanning anything larger.
2- Use paper that is white, unlined, and absorbant. I used to draw on good quality photocoping paper all the time, but you can get a nice ink or bristol pad that works well. You want something fairly smooth, especially if you intend to ink directly on your pencils.
3 – Get a Non-repro blue pencil. These are typically a light blue pencil or pencil lead that doesn’t scan well. This works to your advantage, as you don’t have to erase your pencil lines once you’ve done your inks and this reduces smudging and lightening of the inks.
4 – invest in a good set of inking pens (microns, copic liners.. etc) or use a dip pen and brush. Professional quality inking will carry your drawings far, and look much better when scanned. If you try to use the dip pen and brush, make sure your paper is of a type that’s good for inking like Bristol, otherwise you can smear it all over with your palm or it will ‘bleed’ too much into the paper.
5 – Use a brush to wipe your shavings away from erasing, or you might end up smearing too much ink or pencil and make a mess of your page. If you blow, you might end up spitting slightly on your drawing and cause the ink to run, or a ‘speckling’ effect on large areas of black.
6 – Use proper erasers. A white eraser, a kneeded eraser, and a mechanical eraser are all great investments. Don’t use those lame pink ones they gave you at school. Those just ruin the paper.
7 – Get rulers and Triangles and for the love of god USE THEM. Especially when you are drawing your layouts. There is no excuse for not getting a strait line. There’s also these things called ‘french curves’ to get nice round lines.
8 – Unless you intend to learn how to do so properly, do NOT hand letter. The reason for this is readability. Lettering is actually an artform, it has rules. The computer can normally handle it better than you can do it, its often best to do it on the computer. That way you can maximize readability on the computer screen. And please, don’t ever use Comic Sans. Go and get a decent font from somewhere like Blambot.
9 – Wait until your ink/paint/felt is dry before you scan, and give it a brush. Yes you might be excited, but make sure you give your artwork time to finish drying before plunking it on the scanner bed, and make sure you get those eraser filings off or you’ll end up with weird speckles all over your art when you scan and possibly get your artwork stuck to the scanner bed.
10 – Improve your technique with every page. Experiment. Keep improving. This will make you a great comic artist in the long run. Don’t believe me? Look at some long running webcomics, and look at their first page vs their last. You’ll see how much they improved and you can improve that much too if you keep at it. Just keep going, and you’ll get there.
Now, get out there and make some webcomics.